

Understanding Material App, Scaffold and Widgets in Flutter in 2022
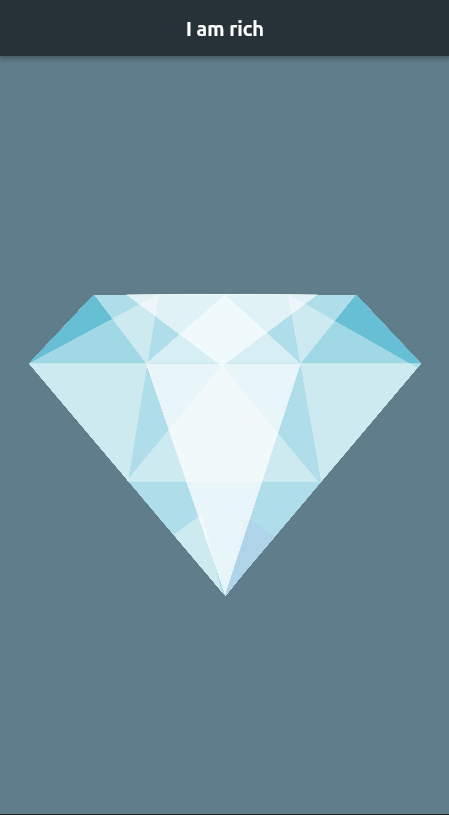
I Am Rich App

About the App
A guy called Arman decided to create an app called I Am Rich. And it was a pretty clever idea. He decided that he was going to make an app that basically does absolutely nothing. It just shows a single icon of a ruby on the screen. And he decide to price it at the maximum possible price at the App Store would allow, which was $999.99, and he pitched it as an art and lifestyle app, for people who are very rich to display to other people how rich they are.Alternatively, for people who are slightly silly to display to the world that they purchased an app that does nothing for $1,000.
But either way, before the app got pulled by Apple, seven or eight people actually bought it, five of which were probably kids. Kids who probably got beaten up by their parents for paying an app that does nothing for $1,000.
But this is a perfect app for us to get started with developing Flutter apps.
Let's Get Started
To begin with, if you haven’t installed Flutter, check out our previous blog How To Create Your First Flutter App.
If you’re good to go, open VS Code, select:
- Start a new Flutter project
- Flutter Application
- Name it: i_am_rich
The project opens with the main.dart file, which contains the code for a sample app. You can test the sample app on iOS and Android to make sure everything is running well and then you can delete all the code and replace it with the code below.
import 'package:flutter/material.dart';
void main() {
  runApp(MaterialApp(
    home: Scaffold(
      backgroundColor: Colors.blueGrey,
      appBar: AppBar(
        title: const Center(child: Text('I am rich')),
        backgroundColor: Colors.blueGrey[900],
      ),
      body: const Center(
          child: Image(
        image: AssetImage('assets/diamond.png'),
      )),
    ),
  ));
}
That’s all the code you need to run this app
Code Breakdown
MaterialApp
Flutter apps are structured like a tree. Here we create a MaterialApp, which is based on the Material Design by Google.
Scaffold
Inside the MaterialApp, we add a Scaffold, which implements the basic material design layout. Inside the Scaffold you can have the main body, as well as app bars, drawers, snack bars, and bottom sheets.
Colors
You can also set the backgroundColor of the Scaffold. By using the Colors class, we tap into Material Design’s color palette.
AppBar
Inside the Scaffold, we add an AppBar which implements a top bar on iOS and Android. Inside the AppBar, we add a title by using a simple Text widget and we also change the backgroundColor like before, to a ‘Walking Dead’ red kind of color.
Centering widgets
For the body of the Scaffold, we use the Center class, which is a widget that centers its child within itself.
Useful shortcut: If you already have a widget and want to embed it into a Center widget, click on the widget and wait for the lightbulb icon to come up next to it and tap it (or click on the widget and tap Ctrl + " . "). Then choose Center widget, which automatically wraps the widget in a Center widget.
Images
For the child of the Center widget, we add an Image widget (don’t confuse it with the Image class from dart-ui), that displays an image that can be from various sources, such as URL, file, etc.
To fetch an image from a URL you can do:
Image(image: NetworkImage('image_url'))
or from an asset:
Image(image: AssetImage('images/diamond.jpg'))
Adding assets to the project
To add images to your project, go to the Project hierarchy, right click on the main project folder -> New -> Directory and create a directory called images. Move your files into that folder.
To specify your assets and images, you need to go to the pubspec.yaml file and uncomment the part where it says:
# The following section is specific to Flutter.
flutter:  # To add assets to your application, add an assets section, like this:
assets:
    - images/
Be careful with the indentation here as yaml files are strict with it. Each level of indentation is two spaces in, so assets: needs to be two spaces in (because it’s under flutter:) and — images/rick_gun.jpg needs to be four spaces in.
If you have a lot of images and don’t want to type all the filenames separately, you can add all the files in the images folder like:
assets:
    - images/diamond.png
Running on iOS / Android Devices
Now you should be able to run the app on both iOS and Android!
Hide the Debug Banner
To hide the debug, you can add debug debugShowCheckedModeBanner: false, in MaterialApp.
YOUR FIRST CHALLENGE
Using what you have learnt from the I am Rich app , you'll be building a simple flutter app from scratch .
You have to create a app called I Am ....... , using everything you have learnt so far . Try to customize the app as much as you can to make it you own!
You can use your own images , or simply find one from the internet .
Please try to complete these challenge and share your app screenshot in the comment section (use pc to share image) or share github link. We would like to appreciate you'll who started with us and build you own written app
